Agfa Isolette III. Type 1350/39. Classic 1950's Folding Rangefinder Camera.
- Kamera Ostalgie

- Nov 26, 2025
- 8 min read

This particular camera belonged to my late Father, who always rated it very highly, it was stored in a bag with loads of sachets of Silica gel and then in a box, and guess what, no sign of any fungus.

Agfa started producing their folding Isolette range of cameras in the late 1930's, the range
stayed in production for around 20 years in various models. The Isolette III was at the top end of the range with it's very useful built in rangefinder. The start of the Isolettes, the pre war version in all black with a Trolite top plate is pictured below. You can see the strong family resemblance.

So, before we touch on the history, lets us have a look at this Isolette III that I have in front of me.
The camera comes in a top quality leather case, made in Germany, the case code number is 6033. The number is neatly embossed on the case back along with Isolette and made in Germany.


It is a high quality case made of the best leather. ISOLETTE and 6033 are clearly seen on the bottom of the case along with MADE IN GERMANY. This case would have cost you £2.10.11 at the time, quite expensive when the camera itself was £23.12.3.

The front of the case has the Agfa trade mark nicely embossed in the bottom right corner. Inside the case it is lined with a soft material in yellow. Unlike many case linings this one is still intact and has not started to crumble.

The black camera covering Agfa called Robusit and was supposed to be very hard wearing and scratch resistant. Looking at this example above, I think time has proved Agfa right.

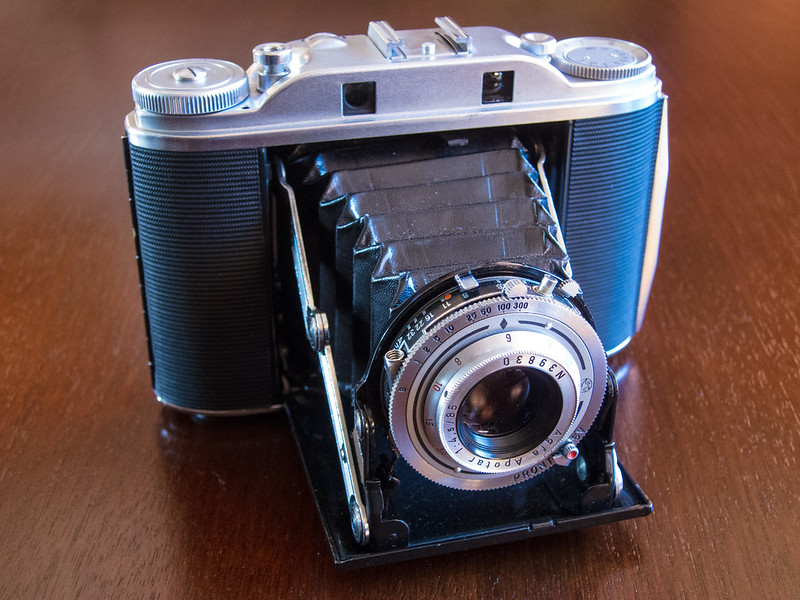
The lens in this particular camera is a Agfa Apotar of 4.5 / 85mm, the sales literature of the time describe it as, the Apotar, a coated, colour corrected, anastigmat lens. This particular example is lens number N 69726.
The shutter is a Pronto, having speeds of B, 25, 50, 100, 200. Focus is down to 3 feet. The focusing is done by using the built in range finder, which is not coupled, you focus using the rangefinder then transfer the distance shown on the rangefinder to the lens.

So in the picture above the rangefinder reads off at 10 feet after bringing the two images of my subject together. Then you just transfer the distance, in this case 10 feet to your camera lens.

So you just move your lens focussing ring until the required 10 feet is opposite the black arrow to the left of the 200 and your image will be in focus and nice and sharp! See picture above. There it is, nice and simple no guess work involved.
Just so everyone is clear the focus mark is the solid black arrow. The black 'V' on the ring above, is the shutter speed mark.
The above photograph also shows the weak point of most Isolettes, the bellows! They might look nice and shiny, but most post war Isolettes will have bellows made of this shiny synthetic plastic material instead of real leather, it is rubbish, it splits, holes on all the folds and corners and makes what would be a really useable camera totally unusable. As bellows go they are about as much use as a chocolate teapot. If you are lucky and your Isolette is pre war or very early post war, the bellows will be leather and have a much better chance of being light tight, but most Isolettes and virtually all Isolette III's will need to have the bellows replaced. Bodging them with glue, tape and various sprays is just a temporary fix and really a total waste of time. So bare that in mind before you splash out loads of money on one, you will need an extra £100-£150 pounds to replace the bellows, even if you can do the repair yourself, replacement bellows themselves are not cheap, anywhere between £50-£100 depending on quality and the supplier.

The best way I think is to buy one cheap with obviously holed bellows then get it repaired rather than pay a lot for what looks a good one only to find after using it a few times the bellows need doing anyway, the lens is dirty, the focus stiff and the shutter sticky.
Other weak spots are the rangefinder being stiff to use, the focus ring being also hard to turn or more likely seized up solid. The shutters also can gum up. A fantastic design was spoilt by cheap poor quality lubricants and nasty plastic bellows. Get a Isolette III fully sorted and it will be a medium format folder that will really perform. The good news is that there is a gentleman in the States who can repair, service and fit new bellows on your Isolette. His link is below. My Dads old Isolette is going there as soon as I have raised some funds !
The image below is on of Certo6's restored Isolette III's just to give you an idea of the quality of the workmanship. Hopefully Jurgen won't mind me using one of his photographs to illustrate this point.

Okay, enough of the bad points, lets look at the good points! The camera is good looking, the rangefinder cuts out the guesswork in focussing, the Apotar lens is a top class lens and will give you great results. If you are lucky there was a version with the 85mm 4.5 Solinar lens which was supposed to be even better. No need to lug around your big vintage TLR if you have a Isolette III with you, the results will be as good, but you loose having to lug all that weight about with you, that you get using most medium format cameras. An excellent camera to have when walking.
Right, I'm digressing a little, lets get back to the actual camera. Looking down at the top plate on the right hand side we have a wheel, with a slightly raised arrow on it. This is the film wind on, or film advance if you prefer. You wind the film on in the direction indicated by the raised arrow, which is anti-clockwise. Next to this is a little hole, if you have just pressed the shutter you will see red at the base of the hole. When you wind your film on, the red will disappear. So if you see red, you need to wind on!

Right next to the wind on wheel is the shutter release button, press this gently and as long as you have wound on, charged your shutter and can't see red, the Pronto shutter will fire.
Next to the shutter release is the rangefinder wheel. If you look through the rather small viewfinder window, you will see a smaller circle in the middle of the frame, the circle is pale blue in colour. You will see two images next to each other, when you turn the rangefinder wheel with your finger whilst looking through the viewfinder, you will see the two images move, the trick is to bring the two images together to get the overall image in focus.

In the middle of the top plate is the accessory shoe, this is handy to mount a little light meter on if you so wish, or of course a flash unit. It's a cold shoe.

On the left side of the top plate is the door opening release button. Press it and the camera pops out and locks in position ready for action. You occasionally might get one that is a little lethargic and may need a helping hand, but it's no big deal. Your allowed to be a little sluggish when you are over seventy!
On the far side of the top plate is another wheel, it's actually a depth of field indicator, it does not do anything to the camera, it's just for your information, and it levels up the top plate nicely, it's German and all nice and symmetrical!

The handbook sort of explains all this if you are lucky enough to find one. Mine is a copy of a copy, so not the best quality, but I will put it in below just so you can study it if needs be.


From the back the Isolette III is nice and uncluttered, with just the red window which has a nice sliding cover so your film does not get fogged.

The camera back opens from the left, though you might have to grow your finger nails a little as there is nothing much to get hold of. The back is hinged from the right side. The cross hatching on the door edge is an unusual touch. I suppose another good thing is that these deep cross hatched door edges do a good job of keeping out the light, not relying on the cheapo option of those horrible foam strips that break up and deposit the dust and goo into the inner workings of your camera! The difference in German and Japanese thinking! I'm with the Germans on this one!


Just a further couple of points to mention, the shutter has to be charged with the little lever popping up right in the middle of this picture, the wind on knob does not automatically charge the shutter and the other point is red figures of 10 and 30 you may have noticed on the rangefinder knob and the focus ring of the lens. There also is a red dot between f 8 and f11 on the aperture scale. This is a sort of quick use system or snapshot mode if you like. So if you have the aperture lever on the red dot and your focus on the red 30 feet then roughly anything between 15feet and infinity will be acceptably in focus. If you have the lens set at 10 feet for taking a group of people for example then between 8 feet and 30 feet should be sharp. I think that this system has not much use when it is a camera with a built in rangefinder like the Isolette III, I mean its just as easy to use the rangefinder and your results will be sharper. I suspect this feature is left over from the ordinary Isolettes where there is no rangefinder, so on such a camera this system would be very useful.

Which sort of reminds me, when I was being taught photography years ago in the early 1970's, we were told to have our cameras set at 30 feet on 125 at f11, then if we had to take a quick snap shot, on those settings the chances are we would get something useable, and yes, it worked. I still do it today, just in case.

The image above is from a period Agfa Catalogue ( kindly copied for me by one of Kamera Ostalgies millons of subscribers ) You can't beat a period advert for a camera. This would have sold me the Isolette if I was looking for a folder way back then ! Brilliant.
Well that's enough from me, I hope you enjoyed this little ramble, if you did please leave a 'like' and if you did like it then please consider subscribing, at the moment it is not really sustainable with only 12 subscribers.
If you want to read more on the Isolette III there are some good articles out there....here is my shortlist of the best.

The above is a new site on me, well worth having a look.
and if you like the Focal guides and want to track down a proper book, as it's always better than reading on line for some reason, how about The Focal Guide on the Isolette by W.D Emanuel.

Okay, that I think is it,
I hope you enjoyed this post.
Take care,
Phil


Comments